Pages

Thursday, January 29, 2015

With the pressure off, we make some fun soaps.


Kai scented on left and Baby Powder on the right.

#babypowder #kaisoap #swirledsoap #artisansoap


I think I am having Butterfly Swirl withdrawal!  After having done so many batches it seems almost unnatural not to be swirling.  I know this is a temporary situation, and if I keep it up Alison will hit me in the head....but today, just because, I split a batch in two and swirled both!  

I promise next time it will be HP or something that doesn't involve a hanger or swirling!

By the way - we did not win the Butterfly Challenge.  We DID learn a lot and had a good time trying.

We are completely out of Kai soap and almost out of Baby Powder which is why I decided to make some today.  When we use the 10" silicone molds we get about 10 bars of soap from each mold so this is the perfect size to replenish our stock.

I divided the batter evenly, making the Baby Powder batch first.


The Baby Powder FO is from +Natures Garden; their description is short and sweet - "reminiscent of Johnson's Baby powder scent" which is exactly why we bought it. Nothing smells better than baby powder (well maybe freshly baked bread....but I digress).

The main colorants, Brushed Pink Mica and Cornflower Celebration Mica, are from +Rustic Escentuals.  We added some Diamond Dust Mica (from +Natures Garden) to the TD (from +Bramble Berry).  For these batches we will use a lot of TD to lighten the batter.  See that 2% written on the side of the Baby Powder bottle? It means there is that much vanilla in the FO.  It also means the soap will discolor, so we are hopeful that the TD will keep it as light as possible. 


Here the blue and pink colorants have been mixed into Safflower oil.
We don't like the 2% vanilla, not at all.


In this shot I have just added the Diamond Dust Mica to the TD which I sift into a container.  see the sparkles floating in the air?
TD is usually lumpy and if we don't strain it we find little white specks all through the soap.
Not very pretty.


The lye/water and oils were about 5 degrees apart when we mixed them.


You can see the emulsification beginning.


Now the TD goes in. Yes, we're straining again; it's surprising how lumpy it is.


The batter immediately becomes lighter.


At this point we evenly divide the batter, one bucket for each scent.


We were spot on the Baby Powder batter weighed 59.25 oz.


And the batter for the Kai weighed in at 59.20 ounces, basically that is .05 oz difference!


In goes the Baby Powder FO.


We added about 1/2 cup of batter to each color, we don't need much.


We poured a little over half the remaining batter into the mold and tamped it down.
You can see it's not runny at all and actually has thickened quite a bit.


In goes the pink batter.


Then the blue.


Once both colors were in I added a layer of white batter, then I used the hanger swirl.
No butterflies, just a mystery swirl.
No pressure, we love it!


After the swirl a layer of solid batter goes on.


Then I plopped dribs and drabs of the remaining batter on top and swirled.

Baby Powder is done!


Now on to the Kai batch.


Kai is a popular FO we bought from +Natures Garden. They describe it as follows:  "contains notes of gardenia, jasmine, cyclamen, lilac, hyacinth, mimosa flower, rose and muguet/lily."
How can we go wrong with a FO that smells this good?

I tried to pick colors that would represent some of the flowers in the scent, purple for the Lilac; pink for the Rose and green for the leaves and the muguet/lily.
+Bramble Berry is where the TD, Amethyst Purple and Fired Up Fuchsia came from, and the Enchanted Forest Mica came from +Rustic Escentuals.


With this batch we are trying something different.  We won't be mixing these colors in batter, we are going to drop small amounts of the colorant (mixed in Safflower oil) right into the batter, then we will swirl it.


Because about 5 - 10 minutes had passed since we finished mixing this batter, it had become rather thick and stiff while we made the Baby Powder batch.
After I stirred in the Kai FO it loosened up a little, but it is still pretty thick.


We started by layering about 1/3 of the batter in the mold.


Then began carefully dropping colorant, we started with pink, then added the purple.


Finishing the first layer with the green.


We spoon (no pouring at this point, batter is way too thick) another layer of non colored batter into the mold, then smooth it into all the corners.


And once again we drib and drab the colors onto the top of the batter in a random manner.


At this point we had noticed a bit of ricing going on with the batter, it wasn't horrible so we just chugged along, grabbing the hanger swirl tool and swirling away.
We have no idea what this will look like, but we're hopeful that it will be pretty.


Once we finished swirling, the batter looked a little strange.


We added the remaining non colored batter, once again smoothing it to cover the top of the swirled batter completely.


A few final dribs of color....


And I lightly swirled the top colors, trying not to stick the skewer too far into the batter.


And here is the finished Kai swirl.

I put both soaps into the curing box and will cut them tomorrow.

Alas, when tomorrow arrived the soap was still a bit soft, so we waited until Thursday.

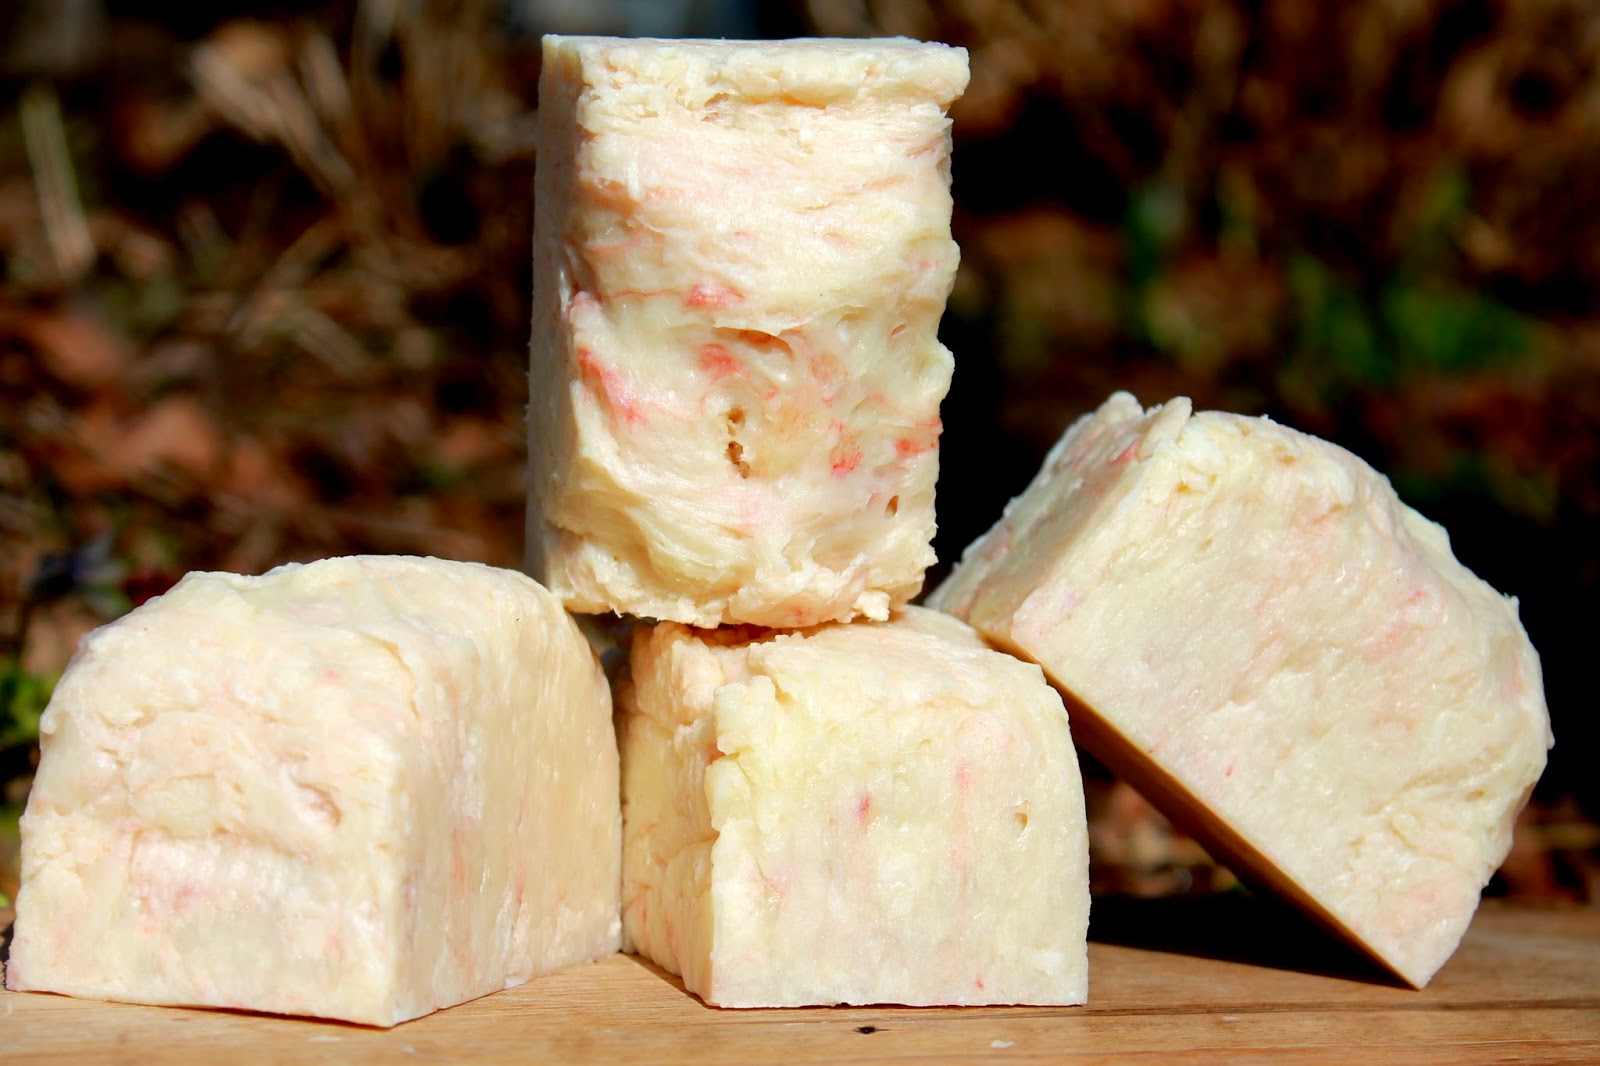
 Finally! Below is the finished soap starting with Baby Powder


No Butterflies in this bar, just a pretty swirl.


We know that more than likely the white background on this soap will discolor somewhat due to the 2% vanilla in this FO.  We added TD to try and keep it as white as possible.  If we can remember we will take a picture of the soap in 6 weeks when it's fully cured and add it to this post.

Now on to the cut Kai


Again, just a pretty swirl, and delightful smell.


The finished Kai bars. We should have no discoloration with this batch as there is just a touch of vanilla.

These soaps will be cured and ready to go on March 10.


Tuesday, January 27, 2015

Cold Weather? Hot Process.


#hotprocess #handmadesoap #goatsmilkandlanolin


Monday, January 26, 2015

While a blizzard is supposed to strike up north, we're lucky today that all we have is a very cold wind blowing outside.  It's cold, but a hot process soap will warm things up!

The entry period for the Great Cakes Soapworks Butterfly Swirl Challenge has closed, and we have 11 batches of truly beautiful and enticingly aromatic soaps curing. We learned some new things about recipes, mixing temperatures, and swirling techniques as we created all of those batches.  Kathy really is so artistic when it comes to swirling colors together and creating beautiful designs in loaves of soap.  I figure that she's the artist, so I can be the chemist (snicker, snicker, snort!).

However, along that line of thinking, I DID develop a new recipe that I used today.  Several of my family members really, really (did I say REALLY?) love the lanolin soap that I made before Christmas, and Kathy and I have been making a variety of goats milk soaps that are pretty dang popular, too.

I have to give credit to my mom for today's idea.  She asked me why couldn't I put the lanolin soap and the goats milk soap together.  I didn't have a good reason not to, so I starting working to do just that.

We've been doing the goats milk soaps as a hot process, and I did the lanolin as a hot process, so I carried that right through today and did this soap as hot process, too.


While Kathy was busy filling Etsy orders and printing out mailing labels, I got the goats milk measured and put into the freezer.  It's best to keep milk cold and slushy so it doesn't curdle and discolor in the heat of the soap.


I mixed warm distilled water with local honey.  Honey helps increase lather and retain moisture.  I think I may want to try a higher honey content in a future batch.


The soap contains the following oils:  Coconut, Palm, Sweet Almond, Castor, Avocado, Olive, Grapeseed, and Palm Kernal Flakes,


I added Icicle Mica to the oils to give the soap a bit of luster. 


Above you can see how beautiful the mica looks when mixed into the oils. 


Next I added the lye/water and used the stick blender until the batter reached a thick trace.  I put the lid on and cooked the batter on high for 30 minutes.  After that I cooked on low and stirred in 15 minute increments until it was done.


While the soap was cooking I got the fragrance and the colors ready.  I originally had planned and blended a completely different fragrance especially for this soap.  I had also planned a color scheme around that fragrance.  Unfortunately, I realized that one of the fragrances I wanted to use had a very low flash point (or maybe it was fortunate that I realized it in time to change my plan).

Kathy helped create a new blend of fragrances that are from +Rustic Escentuals

Rustic describes Bonfire Bliss as "a fragrance reminiscent of gentle, dusky breezes and bonfires, with notes of dried, wind-blown leaves, heliotrope, charred woods of pine and cedar, amber, smoky sandalwood, and musk with a background containing hints of roasted marshmallows, brown sugar, coconut and soft vanilla."  

They describe London Fog as "Jasmine and ylang ylang entwined with rich green citrus and punctuated by ozone and the earthiness of thick moss. Mature and sophisticated."


With that fragrance now in the plan, we decided to use colors that came to mind when we thought about a bonfire:  24 Karat Gold Mica, Aborigine Amber Mica, and an even mixture of Tangerine Wow!, Brick Red Oxide, and Icicle Mica.


Above shows the colors after I had mixed them with a small amount of safflower oil.


Once the soap was done, I added the lanolin and stirred until it was completely melted and evenly mixed throughout the soap.


It did take a little while but this soap is worth the effort.


Next came the honey water,


then it was time for the goats milk.  Technically, I probably should have taken it out of the freezer at the slushy stage, but


frozen works too (Let it go, Let it go! Can't hold it back anymo-o-ore!).  
Kathy scraped and chipped at it until it was in mixable chunks.


All of the frozen goats milk went into the soap,


and I stirred until it was all melted and evenly mixed into the soap.
Isn't your skin screaming, "Oh YES!" just thinking about the 
milk/honey/lanolin goodness of this soap?


Next I mixed in the fragrance oils, again stirring to mix completely and evenly.


Finally, I created three wells in the batter, one for each color, and poured the colors into the batter.


Again with the stirring!!  My arm was definitely getting tired, but this soap was going to be too great to slack off.


A little more stirring to create ribbons of mica swirling through the soap.


The soap was really cooling and hardening at this point, so I had to hurry and slap it into the mold 


one spoon plop at a time until it was all in place.


 I smoothed out the surface, and slammed the mold on the counter several times to be sure the soap was packed in as well as possible.


It was time to put the dividers in!


Don't they look great?
We'll let this sit over night and then see how the bars look when they come out.


Tuesday, January 27, 2015

We took the soap out of the mold after lunch, and we really do love the fragrance blend.


The mica swirls are very very subtle.


And they are ready for their close-ups Mr. DeMille!


"Foggy Night by the Fire" will cure for a week, and then will be ready to go on Feb. 2.