Pages

Sunday, March 30, 2014

A GIANT leap forward (almost)


Today I took a leap of faith, flew solo.

A was busy and I had the time, so decided to make some soap - alone!  I wanted to use the 18 bar wooden mold and use Jasmine as the scent.  Most of the recipes I found were for smaller batches; however, I found one called Soap Classic from 30 year veteran soap maker Kathy Miller's web site  www.millersoap.com.   This sounded like just what I needed. All the ingredients were present and accounted for, so I started measuring the following:

Soap Classic

26 - 30 oz cold water (lower for essential oils, higher for troublesome fragrance oils
12 oz Lye
30 oz Olive Oil (for harder soap substitute 2 oz of cocoa butter for 2 oz of the olive oil)
24 oz Coconut Oil
18 oz Palm Oil

Once I had all the ingredients measured out (but not mixed together), I realized this was going to be a huge batch of soap, probably much bigger than I had anticipated, so with out further ado I poured and stuffed all the ingredients back into their containers and decided to keep looking.  I want to use the Soap Classic recipe in the future but feel that A and I could easily split a batch into 2 and get creative (in different ways, colors, fragrances etc) with each one.

After another search I wound up on Soap Queens blog  (http://www.soapqueen.com/bath-and-body-tutorials/tips-and-tricks/formulating-cold-process-recipes/) and found the following breakdown:


Old Faithful:
This recipe is solid and reliable, and the Castor Oil gives it a super luscious lather. This is a great recipe for beginners because it’s simple and produces great results. It is very similar to our Lots of Lather Quick Mix.
32% Coconut
32%  Palm
32% Olive Oil
10″ Silicone Loaf Mold (50 oz.)9 Bar Birchwood Mold (48 oz.)18 Bar Birchwood Mold (96 oz.)5 lb. Wood Log Mold (80 oz.)
Coconut Oil10.8 oz.10.5 oz21.12 oz.17.2 oz.
Palm Oil10.8 oz.10.5 oz.21.12 oz.17.2 oz.
Olive Oil10.8 oz.10.5 oz.21.12 oz.17.2oz
Castor Oil1.4 oz.1.3 oz.2.6 oz.2.1 oz.
Eureka!!! this is just what I needed, a basic recipe specific to the 18 bar mold, I immediately jotted it down, then paused and realized there was no water/lye information listed.  EEEEK, what to do?  Usually A and I figure things like this out pretty quickly, but A was not there, I was on my own....
Since this recipe was perfect in all ways but lye/water  info I decided to check out the SoapCalc site (www.soapcalc.net/info/helptext.asp) and see if I could figure out how to use it and come up with the correct lye/water amounts for the Old Faithful 18 bar soap.

First I printed the directions, which were very clear, then I added the weight of my ingredients, chose the kind of lye I was using,  and after 6 steps I clicked on calculate and the amount of water and lye needed popped up!  I was set and using soap calc was easy, very really user friendly.

I measured the lye and water amounts and slowly (with goggles, gloves and long sleeves) added the lye to the water (never water to lye) in my kitchen sink.  I mixed up the oils then once the temperatures on both were around 100 degrees, I slowly added my lye/water  mixture to the oils.


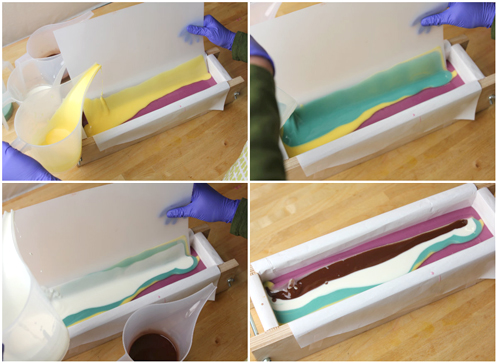
Once the batch reached a light trace I poured off a bit into two measuring cups (about a 1/2 - 2/3 c. each) I mixed green chrome oxide into one (1 T sunflower oil to 1/2 tsp color), and in the other fizzy lemonade ( 1T sunflower oil to 1 tsp yellow and 1/2 tsp titanium dioxide white didn't want it too bright).  The main batch was light but I wanted it almost white so added (1T sunflower oil + 1 tsp ++ titanium dioxide), mixed it in with the hand blender until it was very light.  I mixed in the yellow and green colors with the soap and all three colors were  holding steady at a light to medium trace.  I added the lighter soap to the mold and got ready to add the color when I realized I'd forgotten to add the fragrance, oops!

Now what do I do, I dumped a bit of the fragrance oil into each of the color bowls then put the rest right into the soap that was in the mold, mixing it in with a spatula, then switched to the immersion  blender and let it rip right in the mold.  What did I have to lose at this point?  Once the jasmine scent was  thoroughly mixed in to the base soap, I blended the fragrance into the colors.  At this point I alternately poured yellow and green stripes back and forth on the top of the lighter soap base.


Once all the color was used I took a pick and slowly pulled it back and forth across the top to create a swirl pattern in green and yellow.  I finished it off by doing the same thing across the original swirl.


It looked pretty good if I do say so.  I tapped the mold several times to release air bubbles, and it was time to insert the plastic divider.  As I approached the soap, disaster struck.  Three of the sections of the divider fell into the soap - not good, not good at all!  I carefully removed the three pieces and tried to re-swirl the design; it was somewhat successful.  Hopefully no one will notice.


By the way the jasmine scent from Natures Garden http://www.naturesgardencandles.com smells great, did not accelerate trace, and did not discolor the soap - YAY!!


A did make it by later in the afternoon and we un-molded the Neon Swirl soap and the Cat Vomit,
the Neon Swirl looked great, smelled very light and summery and will be ready to go in 6 weeks.


On the other hand the Cat Vomit looks, um, interesting, has pretty colors, lots of texture (which it isn't supposed to have, it's supposed to be smooth, but I digress) and it smells great.  We aren't sure what to do with it, re-batch or sell, guess time will tell, we will be sure to let you know which way we go on this.


One Day, Two Extremes


We really couldn't decide on a name for this post.  It could easily be any of the following:

Houston, we have a problem
Learning how to read directions - the hard way
Soaping flops 101
Reading reviews is more important than you know
Re-batching soap, not our favorite pastime
The colors are pretty but....

Today we made good soap, and then we made not so good soap, but in doing both we learned a great deal.

After waiting patiently for over a week for the shipment with colorants and much needed palm oil to arrive from the west coast, we discovered that even if FedEx said it had been left outside the garage at A's house, the package was not there.  After quick surveillance around neighboring homes turned up nothing, a call to FedEx was placed ("your package was delivered at 1:38 PM) - panic was setting in.  Thankfully the soap gods were watching out for us (at least at this point they were) and a neighbor showed up, package in hand with the news "this must be yours".  Thankfully all was well and we were off to make soap.

Since this order had expanded our supply colors and scents we decided to get creative, at least with the colors.  A decided to do a soap called Neon Swirl, she found it in the Soap Crafting book by Anne-Marie Faiola.  This recipe makes 8 bars of soap using the following ingredients:
3.0 oz lye
7.2 oz distilled water
5.5 oz palm oil
5.0 oz coconut oil
1.1 oz shea butter
1.5 oz sweet almond oil
8.8 oz olive oil.


A was going for a "tropical beach" theme choosing some of our new colors from Bramble Berry - yellow (Fizzy lemonade), orange (Tangerine Wow and white  (titanium dioxide), all bright warm weather colors.  In keeping with the "tropical beach" theme, A chose a yummy scent from Natures Garden called Palm Island which is out of this world.


The blending of the lye water and oils went really well, and once a light trace was reached we divided the soap into 3 separate containers and added the various colors to each.  Earlier we had created cardboard dividers for the silicone mold  so when poured, each color would have it's own section.


Once all the sections were filled we pulled out the cardboard (note, next time we will use  non porous pieces of plastic to divide the colors - lesson learned).


We dribbled the remaining soap on the top then did a minimal swirl on the top layer to mix up the colors and make the soap visually more interesting.


Once the swirling was done, we cleaned up the rim around the mold, gave the soap a spritz with alcohol, covered it with cardboard and wrapped it in a double layer of towel.  We placed the insulated mold on top of the dryer (which was on) to help keep it warm as it turned into soap.  Our confidence was good, the first batch went really well, smelled good and looked, well, kind of professional.


Now on to the second batch (or as K calls it - cat vomit).  Maybe you can tell, this batch didn't go as planned.

K found a colorful 4 pound recipe on the Soap Queen web site www.soapqueen.com (Anne-Marie Faiola) that would fill one of our larger loaf molds.  The Dandelion Zebra Swirl would incorporate a new technique for us to try.  Partially fill (2/3) of the mold with soap then place a piece of thin plastic diagonally across the mold and into the soap, then you pour one color at a time, across the length of the plastic so it makes colorful layers.  Once all the colors are poured the plastic is removed you top it off with a solid color.

 I changed the colors, but this is what we were hoping for (following 4 pictures are from the soapqueen Web site).


One step mentioned in the recipe was extremely important -  "The key to this technique is having a recipe that moves slowly and stays at a thin trace to get a beautiful layered swirl in the middle."  As we would soon find out the problems we were about to have with fragrance causing swift acceleration were the kiss of death.  We were doomed! we just didn't know it yet.

Initially all went well, I wanted to use some of the new colors we had gotten from Bramble Berry,  a 
white base (titanium dioxide), then layer blue (1982 blue mica), violet (ultramarine violet oxide), green (green chrome oxide) and gold (light gold mica) colors, it was going to be beautiful, (notice I am using past tense).


Since my "theme" was spring so I selected a fragrance from Natures Garden called Butterfly Meadows.  The description was heavenly (www.naturesgardencandles.com), but I did not pay attention to the information regarding the fragrance testing for this scent or reviews by other soap makers,  HUGE mistake!  Fragrance testing very plainly said the following: 

Soap (Cold Process Results)
Moderate acceleration, sets up fast, discolors to a pale yellow, suggest for hp. 
 

Some of the reviews stated that the acceleration was almost immediate, within a few seconds, and only very experienced soap makers should use it as it sets up so fast.   Wish I'd paid attention to this information, oh how I wish....but anyway on with the soap making.


The ingredients for this soap were extensive:

.9 oz argan oil
9 oz canola oil
3.6 oz castor oil
13.5 oz coconut oil
9 oz palm oil
9 oz sunflower seed oil
6.3 oz lye
14.8 oz distilled water
2.8 oz of fragrance


We mixed all the oils added the lye solution, all was good, at light trace we poured 1/2  cup of soap into 4 small bowls, and mixed up our colors.

The mold was ready, the colors were ready, now we added the fragrance.  By the time I poured a bit of fragrance into all colors and some into the balance of the soap it had seized.  I went to mix the fragrance into the soap and it was hard, it happened that fast, within 3 - 5 seconds.  We tried to soften it in the microwave, didn't work,  we tried adding a bit of sunflower oil to each one and it helped just a bit.  What was supposed to be thin trace was now, basically lumpy mashed potato-ish looking soap! not good, not good at all.


We mixed and blended, added the sunflower oil, mixed some more and pretty much knew this was bad.  A checked on the Natures Garden web site and really read the information about the Butterfly Meadows scent, at that point we realized this scent super accelerated, no thin trace for us, no second batch of cool looking designer soap, just.....cat vomit that smells nice!

We quickly went to plan B, which was plop the lumpy soap into the mold, mix up the colors, try to swirl (HA) and then try for a decorative top (again, HA).  We pushed and prodded trying for something resembling style (HA), finally realizing that nothing else could be done we spritzed it with alcohol, put the lid on it and wrapped it up to incubate.


We were done.
Post-mortem we discovered how important it is to read everything about ingredients, EVERYTHING!

So today we made A's soap, the Neon Swirl, and it looks and smells great.  We attempted K's soap, the Dandelion Zebra Swirl, it smells great, but looks....like cat vomit.


UPDATE:  Sunday, March 30, 2013

Today we un-molded and cut the two batches of soap.  The neon swirl turned out really pretty, and the cat vomit is very interesting.  It has texture like a hot process soap, so it doesn't look at all like what we wanted, but it sure does smell great.


Thursday, March 27, 2014

We Make Do with What We Have

We really REALLY wanted to make soap Tuesday, but our supply orders still had not come in (see Economics post).  What's a girl to do?  We look around to see what we have on hand.

We searched for simple soap recipes hoping to find one with few ingredients.  K found a great, gentle-sounding bar on the following Web site:  http://www.soapqueen.com/bath-and-body-tutorials/cold-process-soap/baby-soap-buttermilk-bastille-baby-bar/.  You can certainly click on that link and see exactly what it entails, but we took pictures along the way to share our experience with this recipe.

This Buttermilk Bastille Baby Bar is described as being gentle for babies and sensitive skin, but you HAVE to know your skin.  My daughter (the one who helped make the lemongrass spearmint soap) has some severe allergies, so she would never be able to use this soap because of the buttermilk.


Bastille Baby Bar Recipe:
Olive Oil - 27 oz
Coconut Oil – 5 oz
Buttermilk – 8 oz
Carrot Baby Food – 2.5 oz (make sure it says just carrots and water)
Lye - 4.3 oz

I think it is called a Baby Bar partially because of its gentle properties, but also because it calls for baby food.  It has been a while since there was baby food in either of our houses, so we made some using distilled water and organic carrots.   Ahhh, flashbacks to the baby days!


K also just happened to have some buttermilk in her fridge.  You would NEVER find that in A's house! Usually, when milk instead of water is mixed with lye, it is best to use it in a slushy-frozen state to keep it from getting too hot during the reaction with the lye.  To chill our milk faster, we measured the needed amount and divided it among some of our abundant supply of yogurt cups (which we will wash and use again for something different), and put them in the freezer while we cooked and pureed the carrots.


While the milk continued to chill and the carrots cooled, K lined our mold with freezer paper so it would be ready for the soap.


Milk and carrots and mold at the ready, it was time to create the lye mixture. 1st, measure and mix together the carrots and the slushy buttermilk.

               
(by the way, while cleaning up afterwards, we noticed that the carrots had dyed the edges of our spatulas a yellow-ish, carroty orange)


Then we measured the lye before adding it to the mix.


The recipe suggested keeping the mixture in an ice bath to keep it from becoming too hot.  We did this, but our mixture never got up to the temperature we usually see, so we switched it to a warm water bath to get the temperature up to at least 100 degrees F.


With the lye mixture combined, it was time to mix the oils and warm them to melt the coconut oil.


And now finally we can mix all of the ingredients and create the soap mixture! First add the lye mixture to the oils, then begin to mix using the stick blender.


The recipe warns that trace happens quickly.  We did not find that to be the case, perhaps because our mixtures were not as warm as we expected.  We kept mixing and eventually did reach a thin trace.


(perhaps you can see in the wake of the blender how the mixture is thicker now)

At this point, K felt rather strongly that the carrot orange color was just too orange, so we toned it down a bit by adding titanium dioxide.  We used 1 T of rice bran oil and 1/2 tsp of titanium dioxide.  We added 1 1/2 tsp of the white mixture to the soap in 1/2 tsp increments until it reached a color that K liked.  


If we had added essential or fragrance oils, we would have done so at this point; however, we did not have any on hand that we felt would go well with the ingredients or the intent of a gentle baby bar, so we chose to leave this one in a more natural state without any added fragrances.

The following photos illustrate bringing the mixture to trace.  We mixed for longer than we were expecting, but look at the difference through the progression of the pictures:


(Notice the trail on the surface? Finally, we reached trace!)


Time to pour it into the mold.  The recipe did not mention insulating the mold, but we did it anyway for 24 hours.  It also did not mention misting the surface with alcohol, but we did that as well to prevent any ashy buildup from forming.


Finally, late Wednesday afternoon it was time to remove the soap from the mold and slice it into bars.


Now we have to let it cure for at least 6 weeks.  We'll see how it's doing in May.