Pages

Thursday, May 7, 2015

5-1-15 - Sweet & Green


#Kudzu #hotprocesssoap #handmadesoap #MountainLaurelFestival

Friday, May 1, 2015

The leafy green Kudzu may be "the vine that ate the South," but we sure do love our Kudzu soap! We aren't the only ones who love it.  Visitors to the Celebrate Clayton festival last weekend liked it so much that we didn't have enough left to fill a larger order that came in this week. What does that mean?  Yup!  I made me some kudzu soap today!

I keep saying "I" and "me" because Kathy is out of town for several days having a great time visiting family and friends.  She even kindly has been sending me videos of the beach and the ocean.  Boy, what I wouldn't give to be able to live at the beach!  Hey, I could make soap there, too! 

But enough day dreaming.  Let me tell you about this soap.  If you've been following this blog, you've probably seen us talk about our Kudzu soap before, so I won't bore you with too many details today.
Getting my hot process supplies together.  This soap uses olive, palm, coconut, and castor oils.

The fragrance oil comes from +Natures Garden.  

I never really paid much attention to Kudzu before other than to know that it was a parasitic vine vampire, but I've been learning some interesting things.  Who knew that kudzu actually has a blossom?!  Who knew that people use those blossoms to make things like jelly?!  It really does taste good.  And, this FO really does smell like the Kudzu blossom.  It is almost a grape-like smell but not too much because I really hate grapey smelling things like Kool-aid, or suckers, or anything like that - it's so fake!  This, though, is fresh and sweet and fruity.  It is really a wonderful fragrance.  

Oops.  Sorry.  Said I wouldn't bore you with details...

The colorant is Enchanted Forest Mica from +Rustic Escentuals.  We use this color quite a bit.


Once the crock pot was hot enough and the oils had melted, I added the lye/water and stick blended until the mixture reached a very thick trace.  When we do hot process, we like for the batter to be really puddin'-y thick by the time we stop stick blending.

Above shows how it looked after cooking on High for 30 minutes.  I stirred it well, replaced the lid, then set the timer for 15 minutes.  After the first 30 minutes, I stirred every 15 minutes until the soap was done.  This particular crock pot seems to cook at a lower temp than our others, so where we usually turn it down to low after 30 minutes, with this crock pot I only turned it down to low for the last 1/2 hour.


After 15 minutes (45 min total) it was beginning to really thicken.  At this point, the soap still has a gel-like appearance.

After another 15 minutes (1 hr total on high) The soap looked like this (above).  Still has a very gel-like appearance but getting harder as it cooks.  At this point, I turned the crock pot down to low.  (remember - all crock pots are different, so if you try hot process soap, don't get stuck on times and temperatures.  Go by the appearance of the soap.  Once you get a feel for how your crock pot cooks, then you'll have an idea about how much time you will need for future batches.)

After 15 minutes on low (1 hr 15 minutes total cook time at this point) I stirred again.  If you look at the left side of the picture you can see that the soap is becoming more white in appearance and less gel-like.


After 1 1/2 hours total cook time, the soap looked and smelled ready.  See the soap sticking to the sides of the crock pot?  That is something we have noticed happens as it approaches being done. (Again - after you do this several times you will get a feel for how it looks and smells). Next I incorporated another of the senses...taste.  Yep.  We always do "the zap" to double check for done-ness.  If there is still active lye in the soap, it will zap your tongue as if you had licked the posts on a 9-volt battery.  

Go ahead and find a battery and try it.  I'll still be here when you get back.  

JUST KIDDING!!  Don't do that.  Just take my word for it.

Anyway---I touched the batter to my tongue and it didn't zap or tingle at all.  It just tasted like soap.  If someone tried to wash my mouth out with soap now, I think I would be immune.

I did also use Ph test strips to test the soap.  It is hard for you to see the comparison without the chart that goes along with the strips, which I didn't include in this picture because it only just now occurred to me to do that...But I am showing you the strips so you'll see that we do test and double check the safety of our soap.  That is really important to us.

Interesting side note which you may or may not care about but I'm going to tell you anyway:

As I was cooking this soap, I noticed that our thrift store crock pot has the word "Scovill" on it.  Scovill is a company that is local to us, so I thought that was kind of cool. One of my very close friends from the community theater (he's also a distant cousin) has worked at Scovill for over 20 years, so...

I took a couple of pictures and sent them to him.  I just thought it was cool, but didn't figure that it could possibly be the same Scovill.  I was wrong! Scovill used to make parts for Hamilton Beach appliances when he started working there 25 years ago.  He sent back the photo below:

I just thought that was interesting. Also, I was just kidding when I said I wouldn't bore you with details today.

But back to the soap...


When it was done, I stirred in that delicious smelling fragrance oil and stirred vigorously.

I took out about 3 cups of batter for the green colorant.

Into the white portion of the batter, I stirred a small amount of dried, ground Kudzu leaves.  (Thoroughly washed, pressed dry between towels, then dried in the oven).  It adds a natural, mild exfoliant and some visual interest.

I added the colorant into the 3 cups of reserved batter

and stirred until it was evenly mixed.

I added the green batter back to the pot

and gently folded the two colors together

 to create a nice in-the-pot swirl.  

I slapped the batter into the mold, slammed it against the floor a few times (to evenly pack it in and get rid of air bubbles), added the dividers, slammed it on the floor a couple of more times, then put it in the curing room to cool for 24 hours.  Hot process soap doesn't need to "cure."  It is ready to use as soon as it's cool, but it helps to create a harder bar of soap if you let it sit out in the air and harden for an additional week after you make it.

On Saturday, May 2, I removed it from the mold.  We will deliver it to our customer in a week or so, and then the extra bars will be available at the Mountain Laurel Festival in Clarkesville, GA on Saturday, May 16.


Friday, April 17, 2015

Bugs Be Gone!


#bugbegone #insect-repellent #nomorebugs 

*Note:  we wrote this blog 2 weeks ago and just didn't get around to posting it...

April 2, 2015

When school is out this afternoon spring break officially starts for Habersham County. I'm sure the kids will be mentally starting the break way before the last bell rings today.  Alison and her daughter have a big trip to NYC planned and I am going to be taking care of my 2 grandchildren while their parents go out of the country.  We are all going to have fun!  

Since the soap kitchen will be virtually shut down for the next week or so, we decided to make a batch of HP soap in anticipation of the warmer weather in our imminent future. It may not be the same everywhere, but in our neck of the woods warm weather means bugs; thus the creation of our Bug-Be-Gone soap.

We love making soap, HP or CP. Both have particular characteristics that make it fun.  The HP is great because basically you can use it almost immediately.  To be on the safe side we usually wait a week, but during the clean up of a HP batch we wash without gloves and have never had a problem; it's that safe.  CP is prettier, but oh, the wait!  The wait to us is so long (but worth it, always).


We used the Bug Be Gone EO blend from +Lebermuth Co. The blend includes citronella, lemongrass, orange, eucalyptus and litsea cubeba essential oils.  We also added a little Tea Tree EO from www.bulknaturaloils.com.  This blend of EOs smells better than bug repellant usually smells. We hope the bugs will hate it, though!


The base oils we used were: Olive, Sweet Almond, Coconut, Palm, Castor and Palm Kernel. In this picture we are adding the lye/distilled water into the oil mixture.
We had the crock pot on high while we melted the oils and for the first 1/2 of the cook, then we turned it down to low for the remaining hour and 15 minutes.


Once we added the lye/water we stick blended until we had fairly thick batter or a medium to heavy trace (trace is the drop trail the soap leaves on the surface when you drag your blender across the top).
Another nice thing about HP soap is you don't have to wait for lye/water to cool down, so you can add it to the oils at most any time.


This is what the soap batter looked like after cooking covered, on high for 1/2 hour At this point we stirred it throughly and then turned it down to low.


This picture is about 45 minutes into the cook. We had almost reached the stage that is called "mashed potato," but we still had a way to go yet because we know our usual HP cook time is at least 1-1/2 hours.


At this point the soap had been going for 1 hour and 45 minutes. We did a zap test with no problems, it smelled like soap and tasted like soap - we declared it soap!


Next we had to wait for the soap to cool down enough to add the "Bug Be Gone" because it has a flash point of 70 degrees celsius. As you can see....we are there!


In go the EOs. This actually smells pretty good for a bug repelling scent.


We thoroughly mixed the EOs into the batter,


spooned it into the 18-bar mold,


added the dividers, and then let it sit overnight.


And there you have it - Bug-Be-Gone soap.  


A friend of Alison's told her about using Bug-Be-Gone soap at the beach.  She would rub it all over her skin before going outside, then when she came in, she just hopped in the shower.  She loved it!

We are hopeful that using this soap before a trek in the woods will help keep the bugs off. No promises though! Some bugs are going to bite no matter what precautions we take.


Bug-Be-Gone soap - we are ready for summer!

Thursday, April 16, 2015

Psychedelic Spinning Swirl


#spinningswirl #essentialoils #brightcolors #coldprocesssoap #soapchallengeclub

Monday, April 13, 2015

Hi!  It has been a while and honestly, we have missed being here.  It was spring break in our area, and Soap Lily had to take a break so Kathy and Alison could keep up with all of the activities that we've had going on with our families.

Kathy had her grandchildren for 12 days of fun and play and parties.  Alison went on a tour group field trip with her daughter to NYC and Washington DC.  We seriously had a great spring break!

It has been wonderful and amazing and fun, but we are glad to be back with the activity we have on deck today.

This one is in video form, so we won't say very much here except that this is our entry in the Great Cakes Soapworks Soap Challenge for April.  This month is another new technique for us - the spinning swirl.  SO FUN!!

We usually try these new techniques several times before we pick one to enter in the challenge, but we like this one so much, that we are going with our first product.  In fact, we like the spin swirl so much that we are already planning our next soap with this design (different colors and fragrance though).

We will post pictures below in case you just want to look without watching the video, but we hope you will watch - and enjoy.


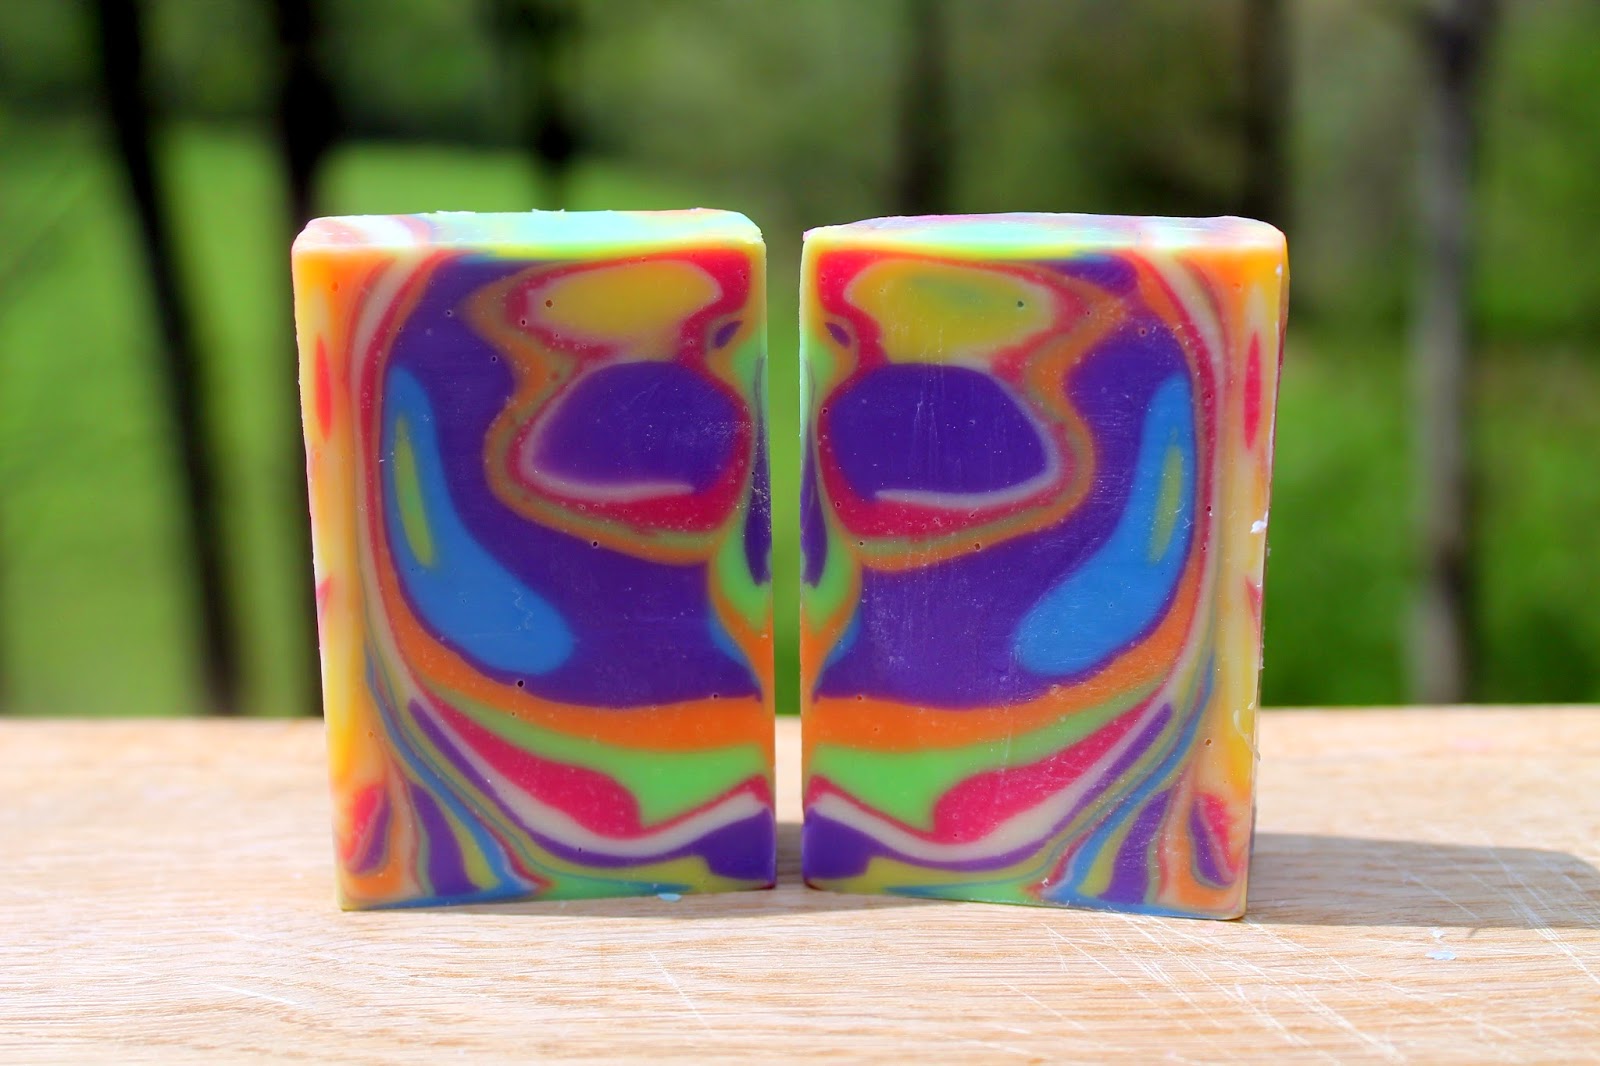
We cut 6 of the bars in half so you can see the swirls inside, and we left 12 bars whole.  These are some big bars of soap!


This soap will be ready to use on May 25.  You won't believe how delicious it smells!


PS -April 17, 2015 

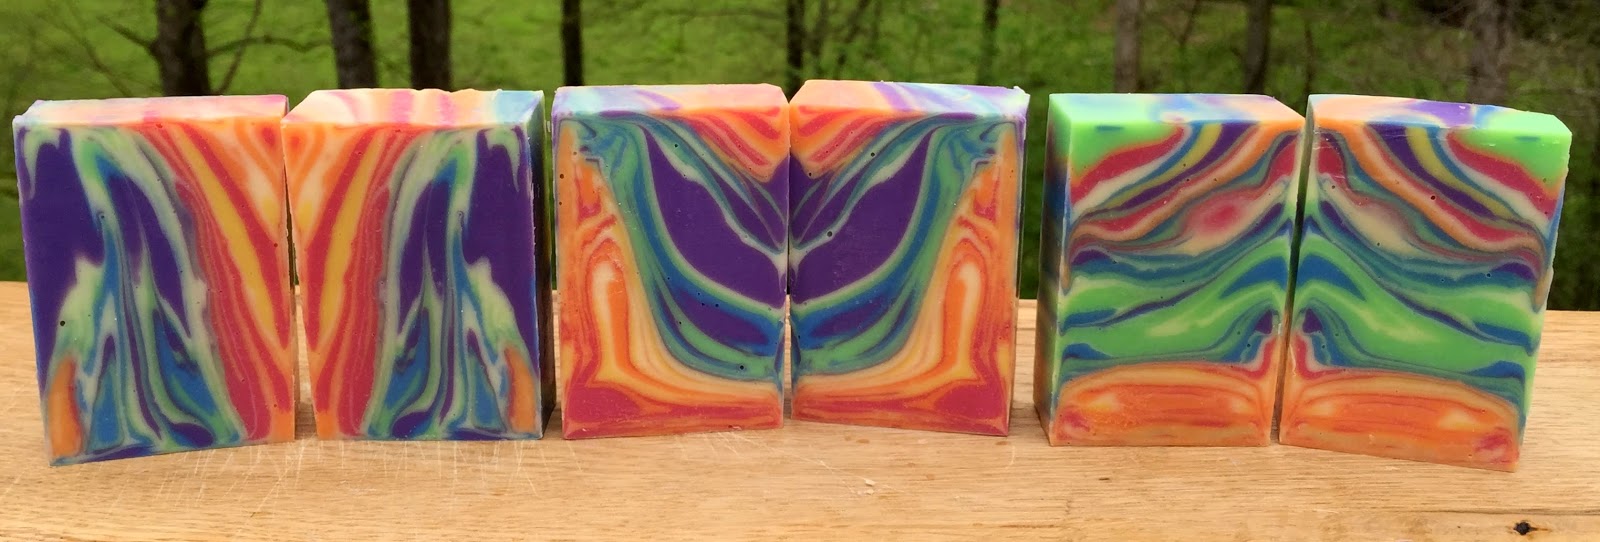
Ok we couldn't stand it and went ahead and cut all 18 bars in half horizontally.

WOW, WOW, WOW!

The colors are amazing, and the patterns are, well......psychedelic for sure.
We love the spinning swirl technique!

Here are pictures of the other half of the batch!


Each and every one is totally different from the others!

Thursday, April 2, 2015

Candles for a change, Cashmere Woods by name


#cashmerewoods #scentedcandle #joywax


March 26, 2015
(We are a tad behind in publishing this post)

Today we converted the soap kitchen into a candle kitchen and poured a batch of special order candles for  Glen Ella Springs Inn.  Glen Ella owners Luci and Ed Kivett currently carry a variety of our soaps in their gift area and decided to give candles a try.  


We are hopeful that the following pictures will give you a general idea of what we do when we make a batch of candles. We're not actually sure that "batch" is the proper terminology, but since we tend to think in soaping terms, a "batch" of candles it is.


As we searched high and low for the best Cashmere Woods scent, we were amazed at how differently they all smelled.  (You can read a little more about the FO in the blog entry "Accidental Obsession.")  Of all the choices we presented, Luci decided on the FO we found at Candlewic who describes it as follows: 

Top Note:  Bergamot, lemon, orange flower
Mid Notes: Lily of the valley, jasmine 
Bottom Notes: Sandalwood, patchouli, amber, vanilla bean, oakmoss, musk 

It is a beautiful scent, and no wonder. With the variety of ingredients, how could it not smell great?

The color of the candles was to be khaki, but since no one makes that color we had to make our own.  We knew the amount of wax would call for two melting pots so both had to have exactly the same amount of colorant.  The only way to get it exact is to use liquid color and add it a drop at a time.  We bought a Spectrum Brown liquid color from +Natures Garden made specifically for candles.


We love to shop thrift stores for our containers, and we always find great looking glassware.  The ones we used for this batch have an etching that swirls around the glass. 


We bought a new kind of wax for this batch,  a slab of Joy Wax from +Natures Garden.  It is their proprietary blend, and the reviews were excellent.  We had our fingers crossed.  We followed NG's advice and ordered our wicks from them.  We find it interesting how the height/length of the wick depends on the diameter of the container.  We are always learning new things!


I cut off what we needed for each pot. No, I didn't cut myself, and yes, I know I was stupid to cut towards my hand. I didn't realize I had done that until looking at the pictures.


We duplicated the amount of wax in each melting pot exactly. We will be adding color and fragrance to each pot and want the overall candles to look and smell exactly the same.


Both melting pots are sitting in "double boilers" slowly melting.


While the wax is melting I glued the wicks into the containers.


Once the wicks were glued down, we used strips of tape with small holes in the center to keep the wicks centered when we pour the hot wax into the containers.


We poured the proper amount of FO into two different bowls, one for each pot.


The wax in both pots melted, and now we add the color one drop at a time.


Alison had a great idea - put a drop of colored wax on glass so we can actually see what it will look like in the candle.  You can see the progression of drops in the photograph above.  Once we hit three drops of color we stopped. We think it's a perfect khaki color.


We let the hot wax cool down a little then poured in the Cashmere Woods FO.


We knew each candle should weigh 6 ounces, so the first pour was weighed exactly.  This gave us a visual pour line for the rest of the candles.


Once the candles were poured, we left them to sit, undisturbed overnight, to "cure".  We are very happy with the Joy Wax because it was touted as a one pour wax and is exactly that! Only one pour necessary. This wax didn't settle. YAY!!!


We had a bit of left over wax so we poured into a "test candle" which we will burn to see how the wax, color, wick and scent perform.


This is how the "test candle" looks. The burn pool is great (the melted wax while it burns), the wick is working great, and the smell.....oh boy, it is fantastic!


The finished Cashmere Woods candle


.