Pages

Thursday, June 5, 2014

Sunflowers that turned into Poinsettias

Wednesday June 4, 2014

Today was all about trying again when things didn't go as planned the first time.  Alison created individual "flower" soaps a month or so ago.  They look cute, but didn't pour or swirl exactly as planned.  Today we decided to have a "do-over" and try and make the finished soap look as good as the picture.

After much discussion we came to the conclusion that one of the main reasons the earlier batch thickened to quickly was because the temperature was too hot.  For today's  batch we would keep the oils and lye/water at 90 degrees when we mixed them together.  Since we were making soap with embedded flowers we chose Sweet Pea and Ivy FO from +Lebermuth Co.  In an effort to further ensure a slow moving soap, we double checked to make sure there was nothing written about fast acceleration or seizing (some FO's will do this). 

We decided to use the wood mold from +Bramble Berry, it has inserts that perfectly divide the finished soap into 18 bars.  

For the colors we decided to make an bright African Daisy type flower, sort of like this:


so we chose yellow (fizzy lemonade) for the outer petals and a mixture of brick red and fired up fushia for the inner petals, and using a dab of chrome green for the center


It didn't take long for the soap to emulsify, and we wanted to keep the soap very liquid, so as soon as it had emulsified, we added the scent to the batter.  Then we went ahead and mixed the colors before we had even a light trace.

Since we needed just enough to do the flowers ,we poured about 1/2 cup of batter into each color and mixed it well.  

We filled the mold with the remaining basic batter, inserted the dividers and pressed them into the soap.  

Alison said that this looks like ketchup and mustard - especially when we put them into the condiment bottles to make the designs.


Once it was mixed we poured the colored batter into squirt bottles. 


Once we started on the flower designs, we noticed that the batter in the squirt bottles wasn't sinking into the soap.  It was all supposed to be liquid, and the circles were supposed to just lie flat on the bars, actually becoming part of the surface of the soap.  We tried submerging the tip of the bottle into the soap, but it didn't really work either. 

Once we had made the color circles on each bar of soap, we began to use the skewer technique to create the flower design.  Just like Alison experienced the last time she tried this design, we noticed the swirls we were making with the skewers were leaving trails in the soap; it was thickening that fast.


This kind of looks like a Target commercial gone bad, or a bulls eye chart that is off kilter.  No matter, we kept swirling and dabbing at our flowers.


In this picture if you look carefully you can see the yellow batter kind of in the batter while the red  and green are fairly prominent on the top.


Once the swirling was done we both stood back and just sighed.  Foiled again, this is not what we wanted, rather than sun flowers this looks like Poinsettias Gone Wild, or Red Spider Lilies.  Maybe once it cures it will look better....not what we planned though.


To give you an idea about how hard the batter got, this is where we put the left over from squirt bottles, looks like a free form sculpture, it was so thick I couldn't even swirl it.

We just can't figure it out.  We followed the recipe from lovinsoap.com and followed the example for flowers on cold process soap.  The first two times we used this recipe, it stayed very liquid as it was supposed to.  What happened these last two times to make it thicken so quickly?


One of the parts of soap making we never show you is "clean up,"  we have to keep the gloves on because the soap batter still has lye in it, and believe me there is soap everywhere.  The squirt bottles were pretty tough to clean.
.


Even though we are making soap we have to change the sink water (and add new detergent) several times. There is so much oil in the soap it's hard to get off without using plenty of dish detergent.

Sorry about the sink full of dishes. The soap business is not always glamorous, and pretty. Just thought you'd like to know.


******************************************************************************************************

Thursday, June 5, 2014

Want to see what it looks like after being insulated for 24 hours?


Around the edges of each bar, we still see some gel.  We will leave it in the mold for a bit longer before we see how the individual bars look

Later Thursday afternoon we checked the soap again and it looked fine so we took it out of the mold.


Please don't scroll back up and compare the soap to the flower, we didn't get even close!  


and for the last shot


This soap will cure in six weeks, inspite of the hard to identify "flower" it smells heavenly.

Whoa! We tried 4 different fragrances today! Here are the 1st two.

Tuesday, June 3, 2014


 Batch #1

I guess we just don't do anything small or easy if we can find a way to complicate it.  That's okay, though..  We figure that we learn quite a bit, and we create some pretty darn interesting things.  Take today for example.

We started the day early - way too early - because of other obligations that were scheduled later.  When I walked in, Kathy already had a row of fragrances lined up on the counter, and she asked the pivotal question for the day:  What do you think about making a batch, halving it, and making two different scents?

What other answer could there be?  I said, "Let's do it!"  So we did.  Twice!

For our first batch we decided to use The Vert from +Lebermuth Co. and Kai from +Natures Garden.  We also decided to do a couple of other things.  First we decided that we were NOT going to add any titanium dioxide to the batch.  We wanted to see how the color of the soap would come out without added colorant, and we wanted to see how the bit of colorant we did use would look without a base of white.

Today's colors were to be simple, so we chose blues for The Vert and greens for Kai.  The plan was to put some color in the middle of the mold and then swirl gently, trying NOT to bring the color up to the top of the soap - sort of a swirly soap sandwich if that description helps.  Maybe the pictures will make sense.


The recipe we used called for coconut, olive, palm, and castor oils.  See below as we began mixing after adding the lye/water.


 After bringing the batter to light trace, we divided it in half pouring 1/2 into a large pyrex mixing bowl and leaving the other 1/2 in our mixing pot.  I cannot get over how often we use math when making soap.  Really!  Math teachers everywhere - thank you!


We didn't mix the batter in a container with marked measurements, so we had to figure out how to get 1/2 of the batter. It was important because we needed to get the correct ratio of fragrance oil to soap. (fractions and ratios...math again!).  We got smart and remembered our handy dandy soapcalc printout that we made, so we consulted it for the total amount of batter.  That would tell us exactly how much we needed!  We felt so smart, so brilliant, in fact.  We got the scale out and weighed out exactly 1/2 of the total batter.  See our chart below (and the basic recipe comes with many thanks from Bramble Berry):


Rather than use additional oil to mix the color, we decided today just to use a small amount of the soap batter itself.  So, after dividing the batter in 1/2 we mixed in the fragrance oils.  Then, we took a small bit of each batter and mixed our colors.  When the micas and oxides were evenly mixed, we added enough to make about 1/2 cup of total of each color.


blues went into the Vert
Here is a description of The Vert is according to Lebermuth:
"Harmony and balance meet in the luminous notes of fresh bergamot and lemon zest blissfully blended with tender green tea leaves, island blossoms and crisp white musk."


Greens went into Kai
And here is a description of Kai from Natures Garden:
"an aroma that contains notes of gardenia, jasmine, cyclamen, lilac, hyacinth, mimosa flower, rose, muguet/lily"


Here is where things began to get weird.  Kathy's 1/2, the Kai scented, had already gotten VERY thick.  We don't think it really seized because we have had that happen before.  This was not the same.  It just got very thick very quickly.  Where she had intended to pour batter into the mold, she had to scoop and plop it.


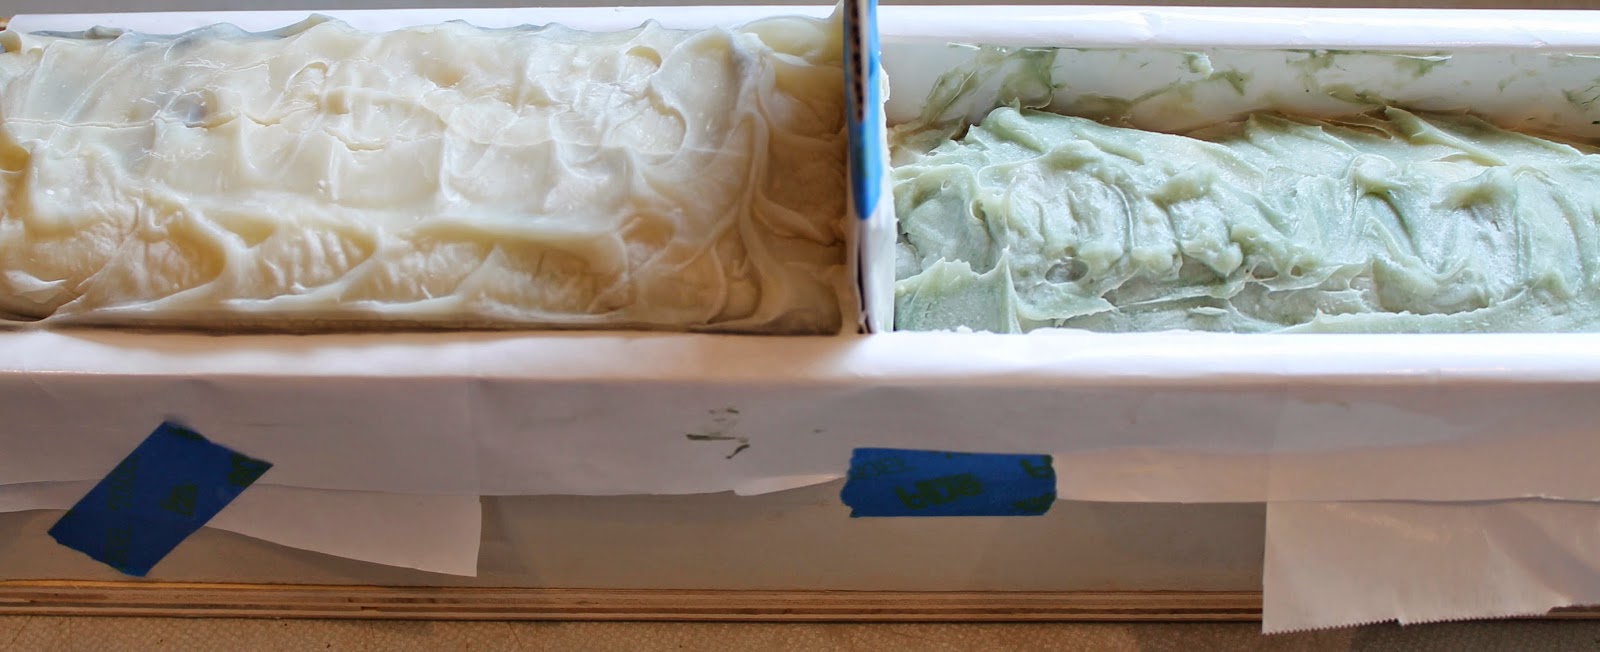
Started with a white layer on bottom.  


We were very pleased with how white the batter
looks without the addition of titanium dioxide.


Then it was time for a green layer.  The plan here was for a thin layer of color in the middle.  Thin was just NOT happening.


Notice the handy divider we made to separate the two fragrances?  We divided the mold in 1/2 as well as the batter!


Here you can see Kathy gently swirling the color.  The goal was to only swirl gently in the middle
without bringing the color to the top of the soap.


Such a thick batter made it more difficult to make the swirl that we had intended, but no matter.  The final soap is still very pretty!


Now we go to the flip side.  We scented the other 1/2 of the batter with The Vert.  For some odd reason it did not thicken up like the batter with Kai did.


See how pourable?  It is not thin at all, but definitely not scoop and plop.


Final layer of white on top and some left over.  We had to put soap batter
into 3 silicone cupcake cups because there was no more room in the mold.


This is how it looked after gently swirling the color in the middle.


Look at both soaps.  Notice anything?  We did.


How in the heck did we wind up with so much of The Vert and so little Kai?  We checked the amounts and measured out 1/2 of the batter.  We divided the mold in 1/2.  What happened?

Go back and look at our soapcalc print out again.  See where it lists the oils and underneath says "totals?"  Well, that is the number that  (Kathy inadvertently) we looked at when (Kathy) we figured out what 1/2 would be.  The total oils is 65.96 ounces, so we measured out 33 ounces of batter for the Kai mixture.  

(note from Kathy changing font so you know it's me) 
I completely misread the soapcalc print, I looked at the top line and only saw 65.96 oz. total for the oil weight, and gave that info to Alison so she could divide the batter in two.  When we poured the batter into the bowl it was hard to tell the batch size difference as mine was in a tapered measuring cup and Alison's was still in our soaping pot.  Since the clock was ticking on the soap thickening (which we didn't want) we went ahead and added the fragrance oils to the respective batters.  Once we'd mixed in the colors and actually put the soap in the mold it was obvious something was way off.  Then we discovered I didn't read the correct total.  In the future I will ALWAYS know where to look for the TOTAL weight - I take full responsibility for this.)  

Look very closely.  We (Kathy) should have looked at the TOTAL that also includes the lye and water.  The total volume of the whole batch was actually 100.666 grams.  We should have measured out at least 50 grams!
Like I said at the beginning, we always seem to learn something or at the very least do something interesting.
Our mantra is "It looks good, it smells good, it feels good."  So far, we are 2 for 3.  Both scents look good (we'll see how they look cut into bars Wednesday), and both scents smell good.  In 6 weeks we will see if they both feel good after they have cured.

So it's Wednesday evening and I am going to finish us this post, maybe you noticed my personalization regarding exactly who mis-read the soap calc, it was me (Kathy), and I take full responsibility for a nice smell, but smaller bar, believe me that's the last time that will happen.  Alison is right, we always learn something.

We cut all four batches today and inspite of the mistake I made all four batches look great and smell divine.  The following pictures show what the soap log looks like before we cut it, first The Vert.


this is what it looked like after it was cut into 1" thick bars


very pretty


And now on to the smaller size Kai soap, the first picture is what it looked like in log form right after we un-molded it.


Three random bars, you can see each one is slightly different


Here is the Kai bar, it's a little small but makes up for it in the nice scent.


(the other two bars are shown on a separate post)

Cutting the Red Palm oil soap we made on Monday

Wednesday, June 4, 2014


Wednesday, June 4, 2014

We're curious about where other soapers get palm oil.

Tuesday, June 3, 2014

If you are a soaper who loves to talk about all things soap, this blog entry is for you.  If you like to see what we are making, then this will probably not be very interesting for you.  Look at the next blog entry for today, because it is VERy interesting, and thanks for reading our blog!!

We have come to rely on palm oil quite a bit.  Do other soapers use it too? It seems to be pretty common given how much we find written about it, and how often we find low quantities or "out of stock" from some suppliers.  Of course, we are still relatively new soapers, so maybe our experience is an anomaly.

We have ordered from Bramble Berry, and from Soapers Choice; we have ordered from J. Edwards (yesterday's Red Palm), and we have ordered from Bulk Apothecary.  Everyone has something different in their product or their packaging.

BrambleBerry offers microwavable, boil-able bags, but if you use it in large quantities, those bags aren't economical.  Also, as much as we love BrambleBerry and their great ideas, support, and products, orders simply take a long time to get to us.  Maybe we're impatient, but it just seems like it takes much longer than other places from which we have ordered.

Soapers Choice had some larger packaging and containers that were easy to handle, but we didn't like the idea of microwaving the same plastic bottles over and over again.  Plus, the bottles are too tall for the microwave so we have to lay them on their sides which leads to leakage all over the microwave as they are heating.

We finally came upon a good price for a large bucket of palm oil but it is a pain in the bucket to deal with.  We could buy a pump lid (and if we continue to use palm oil so much we probably will) but remember that Kathy and I both have the same middle name - "Thrifty."  Wait - we both have the same last name, too.  Weird.

The reheating issue with palm oil is that it solidifies in between uses but as it hardens, the particles in it settle toward the bottom of the container.  If you do not reheat it and mix it evenly between uses, you will end up with very different soaps using the oil from the top of the container and the bottom. (Or so we've learned from our research.  We have not experienced it ourselves because we haven't taken the risk.)

There is a homogenized cube of palm oil that we could purchase, but the suppliers all warn that they are not responsible for melting that could occur in transit.  We just can't risk losing money on melted palm oil, so it will probably be winter before we try that.  The cube sounds like the way to go, if you can get it because you don't have to melt it.  You can just cut off what you need.

We would sure love to get comments from anyone who has tried it to hear what you experienced and what you think!

The palm oil we are using right now is the 40 lb bucket from +Bulk Apothecary.  It is different from any other that we have used in that it has never completely solidified.  It is very watery, but we can see solid particles suspended in it.  We spend a lot of time stirring it before each use, then when we measure out what we need for a batch, we still heat it until it is melted to ensure that the particles are evenly suspended and combined throughout the portion that we use.  Does this really matter since we are not completely melting the entire bucket each time?  Do we even need to worry about it with a bucket that never seems to return to a solid state?

Below are pictures of this bucket of oil, just to give you an idea of what we are talking about.


We use a drill attachment paint stirrer to mix up the oil, 
but we stir it by hand because the drill just seems like overkill. 


Notice that the oil is not clear?  Once we melt it, it does become a clear oil, not colorless, but clear.

We like to use palm oil because it is rich in Vitamin E (the red palm oil we used yesterday can be used in cooking) but also because it produces a harder bar of soap with a nice, creamy lather.

We would love to hear about other soapers' experience with palm oils!

Tuesday, June 3, 2014

We tried to fix a blunder, and make soap with new and exotic ingredients

Monday June 2, 2014


Our Square credit card readers have arrived! We were thrilled, so happy in fact, that we decided to charge $3.00 to each of our credit cards to experiment. It was so easy, just as the advertisement says.  Easypeasy! 

But, that was the only easy part of the day. Next we decided to make soap, but you need to hear the backstory first.  Yes, a soap with a backstory.

Today's soaping adventure started with a mistake.  I will clarify; it was mine (Kathy's).  Here are the sordid details...as I remember them!

About 2 months ago we were getting low on palm oil, and since our middle name is thrifty, I was trying to find the "thriftiest" palm oil around.  After lots and lots of time comparing prices, shipping etc. I decided that J.Edwards (www.bulknaturaloils.com) had the best price and promptly ordered 4 16 oz bottles of palm oil, not paying attention to the difference in the name, "Red Palm Super Olein."  I was thrilled at the price and quick shipping, but It was not plain and simple "palm oil."

The thrill was gone as soon as the shipment arrived, and a big fat OOPS took it's place.  This oil was orange, I mean, deep dark red orange, not the usual pale beige color we were used to.  I'd made a huge mistake, and since I'd opened one of the bottles the company would only take 3 back.  When we thought about it, though, there was the matter of return shipping and restocking fees, which we would have eaten. So, long story short, we kept the Red Palm Super Olein oil.

We checked online and discovered that if you use too much of this oil it literally will make the soap bubbles orange, along with wash cloths, soap molds, silicone spoons and anything else that comes in contact with the soap depending on how much of it you add to your recipe; this was not a promising thought!  Another site said to only use this oil as 10% of the total oils and the soap would be fine.  With a wing and a prayer, we made a plan.

Since we were kind of experimenting, we cut the soap batch in half.  We couldn't stand the thought of wasting 15 bars of soap if things went badly when we could get away with wasting only 8 (I am trying to be optimistic)! Given that we were making a smaller batch, we decided to use our small, silicone mold.  We also thought this would be a good test to see if the oil discolored the silicone.  For the sake of true scientific experimentation, we took a before picture of the mold.


 I had posted a question about the oil on the www.soapqueen.com  page about tips, tricks, and tutorials.  Amanda from Bramble Berry replied and suggested that because it is a soft oil, it could be substituted for olive oil.

Now we had a better plan.  We would use the Super Olein as 10% of our total oils, but reduce the amount from the olive oil in the recipe.  Alison entered the recipe in soapcalc.net to be sure the lye and water amounts were safe and accurate, and away we went!


You can see the dark orange color of the oil.  Since we knew the soap was going to have some kind of orangish/yellow coloration we used our Honey & Oatmeal FO from +Lebermuth, and did not add any extra color.  This scent is really nice; however, there is a strong Almond fragrance that we both noticed, not unpleasant, but not a honey and oatmeal scent either.  Once the soap cures the almond scent may recede and the honey and oatmeal come out.  We will just have to wait and see.


Once all the oils were weighed and poured (we'd mixed the lye/water earlier so it could cool down a bit) we mixed in the lye/water and mixed it up using the stick blender.  Once we had a light trace we added the scent, and it did smell a little different "in" the soap rather than "in" the bottle.


We noticed the orange color on our spatula and immediately assumed that we
were about to be left with stained silicone, both on the spatula and in our mold.
We were pleased to find when we cleaned up and washed dishes, that
the spatula showed no sign of stains.


We mixed the soap for about 4 - 5 minutes then (one at a time) added 3 TBSP of colloidal oatmeal (pulverized) to the soap.  


We decided to try our hand at video today (is that just too many new things for one day?)  It is not perfect by any means, but it will give you a good idea of how the process went.


We squirted the alcohol on the top and wrapped it in the curing box.  We sprayed the soap again after 30 minutes, then Alison's daughter (Emma)  went to spray it the third time.  She hadn't been in there long when she called us both in for a look see.  The soap had changed color.       


We hope (pause), that the soap is going through what is called the gel phase.  At this point we aren't sure,  I checked the soap again 3 hours later, and it looked like this.  I thought maybe it was too hot so unwrapped it and opened the lid of the box to let air in.  We will take additional pictures tomorrow and add them later.


Hopefully my mistake will have a happy ending, but we won't know until tomorrow.  For now, we have all of our fingers (and toes) crossed!


Sunday, June 1, 2014

A quick trip to the Mediterranean, via soap

Friday may 30th, 2014

Since wires were crossed today and Alison wasn't coming over  I enlisted my brother's assistance in making a batch of soap.  Keith is visiting from Florida, making soap is about a foreign to him as rebuilding a car engine is to me, none the less he offered to help.

During the hours we spent reading about EO's and FO's (essential oils and fragrance oils) Alison and I found a FO at  +Bramble Berry  called Neroli and Shea Blossom.   Knowing my daughter Talley is very partial to a perfume called 'Neroli Portofino' by Tom Ford, I  was intrigued to see the following description:
"We were inspired by Tom Ford's Neroli Portofino perfume when creating this blend. Our fragrance brings together notes of citrus and amber which make it a clean, tropical, floral scent that can easily match the interests of both men and women. Top notes are light which consist of bergamot, neroli, and lime. The middle notes of jasmine and orange blossom are perfectly paired alongside base notes of amber and cedar.

So we ordered the fragrance oil (and many other goodies) and waited for it's arrival.

The Neroli and Shea Blossom scent arrived at the end of April and we both smelled it, Alison liked it, but it didn't hit a home run for her, I had smelled the perfume and thought it was very, very close and had a lovely scent.  Alison and I realize we won't always agree on everything, and it works out ok, because we understand that and work right through it or around it as the case may be.  

To spare Alison from a scent she wasn't crazy about  Keith and I made Neroil and Shea Blossom soap.

We used the Old Faithful recipe for CP soap, with palm, coconut, olive and castor oils mixed with the lye/water.  We've used this recipe several times, it works very well when swirling or mixing colors as it is slow to trace (thicken).

I wanted the soap to incorporate the beautiful shades of blue in the Tyrrhenian Sea which surround the Isle of Capri just off the coast of Italy.  The following is a stock picture of what the water looks like, nice isn't it.


 I chose aqua pearl mica and 1982 blue mica from +Bramble Berry, I mixed up some TD (titianium dioxide) which will keep the white part of the soap very light.


After mixing the oils and lye/water together by hand, we then used the stick blender to speed up the process, the soap was at light trace in just a few minutes.  We mixed in the Neroli FO (fragrance oil), then poured a cup and a half of batter (each) into two smaller measuring cups; adding the aqua pearl to one and the 1982 blue to the other.  When the colors were mixed enough we added the TD to the remaining batter. 

We used the rectangular mold, (see picture below) pouring white as the first layer (approx. 1/2" deep), I then spooned, (in no particular order) the two blue colors back and forth and in and out on the next layer, then came another layer of white, then the colors again, there were 3 layers total, ending with white.  

When the mold was almost filled I used a skewer and swirled the soap, minimal swirling, hopefully enough to give the soap a nice look when it's cut.  The last bit of white soap went on top, I used a spoon to finish the edges and top.  


This is what the soap looked like once we poured it into the log mold.  The two shades of blue peek out here and there on the sides, this wasn't planned, but once it happened we were ok as it is a hint of what is in the soap.


We put the soap away wrapped in a box and covered with towels to let is cure.  On Saturday I took it out and cut the bars, the picture below is what the side of the soap looked like.


I am really happy with the colors, the blues turned out exactly the way I wanted them to look!


The group shot picture, I love the variation of the colors, a bit different in each bar.


Neroli & Shea Blossom Soap the colors of Capri!

Hope you enjoyed your travels with Soap Lily today!